A simple bank account application
Overview
This is a simple bank account application, which can be found in the scalardl repository. The actions that a user can perform are: create an account, view an account history, deposit funds to an account, withdraw funds from an account, and transfer funds between accounts. All actions performed on an account are recorded in ScalarDL, which means that the account history is recorded in a tamper-evident way, similar to how blockchains record blocks. This means that if an account history was altered (either intentionally or not), it is possible to detect this.
To keep things simple here we are assuming that the bank holds the private key to execute all the contracts (see below for more explanation of how this works). This is probably not how you would want to use this bank application in practice. In this case a malicious account manager could actually change a user's account history, e.g., by simply recreating it and filling it with false data. A more meaningful setup is that the bank owns the private key to deposit to an account, and each user registers a withdrawal and transfer contract using their own private key. Then only the bank can move funds into an account, and only users can move funds out of their accounts.
This application uses five contracts:
These contracts will be registered by the bank and will allow the bank to, respectively, view account histories, create accounts, deposit funds to an account, transfer funds between accounts, and withdraw funds from accounts.
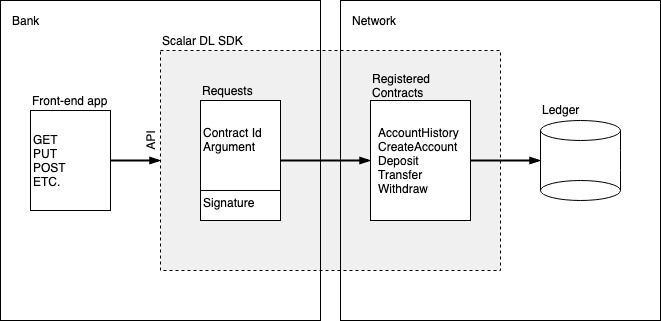
The overall architecture of this application can be viewed as follows. (Note again that this use case is for simplicity, and in practice may look a bit different.)
Trying out the application
Download the ScalarDL Client SDK. Make sure ScalarDL is running and register all the required contracts by executing
$ SCALAR_SDK_HOME=/path/to/scalardl-client-sdk ./register
Run the application using IntelliJ (or the IDE of your choice), or by executing gradle bootRun in the project home directory. It should create a server on localhost:8080 to which you can send HTTP requests in order to interact with the app. See the API documentation for more information. To create HTTP requests we have found that Postman is quite nice.
A short tutorial on writing a ScalarDL application
We decided to use Spring Boot to create a web service to interact with the contracts. This is, of course, not the only choice. Another choice would be to create a command line interface as was done, for example, in the asset management application. There you can also find a very nice tutorial for writing applications for ScalarDL.
In this tutorial we will not discuss the detail at the level of web services or command line interfaces, and instead focus on the interaction between our application and ScalarDL. We will discuss how to write contracts, register contracts, and then how to call these contracts from the application using the ScalarDL SDK.
Contracts
Contracts are Java classes which extend the Contract class and override the invoke method. Let's take a closer look at the Deposit.java contract.
package com.scalar.application.bankaccount.contract;

import com.scalar.dl.ledger.asset.Asset;
import com.scalar.dl.ledger.contract.Contract;
import com.scalar.dl.ledger.exception.ContractContextException;
import com.scalar.dl.ledger.database.Ledger;
import java.util.Optional;
import javax.json.Json;
import javax.json.JsonObject;

public class Deposit extends Contract {
  @Override
  public JsonObject invoke(Ledger ledger, JsonObject argument, Optional<JsonObject> property) {
    if (!(argument.containsKey("id") && argument.containsKey("amount"))) {
      throw new ContractContextException("a required key is missing: id and/or amount");
    }

    String id = argument.getString("id");
    long amount = argument.getJsonNumber("amount").longValue();

    if (amount < 0) {
      throw new ContractContextException("amount is negative");
    }

    Optional<Asset> response = ledger.get(id);

    if (!response.isPresent()) {
      throw new ContractContextException("account does not exist");
    }

    long oldBalance = response.get().data().getInt("balance");
    long newBalance = oldBalance + amount;

    ledger.put(id, Json.createObjectBuilder().add("balance", newBalance).build());
    return Json.createObjectBuilder()
        .add("status", "succeeded")
        .add("old_balance", oldBalance)
        .add("new_balance", newBalance)
        .build();
  }
}
In order for this contract to function properly the user must supply an account id and an amount. So the first thing to do is check whether the argument contains these two keys, and if not, throw a ContractContextException.
Note: ContractContextException is the only throwable exception in a contract and it should be thrown whenever a non-recoverable error is encountered.
So, assuming that we have an id and an amount, we do a quick non-negative check on amount and again throw a ContractContextException if it is. Now we are ready to interact with the ledger.
There are three methods that can be called on ledger: get(String s), put(String s, JsonObject jsonObject), and scan(AssetFilter assetFilter). get(String s) will retrieve the asset s from the ledger. put(String s, JsonObject argument) will associate the asset s with the data jsonObject and increase the age of the asset. scan(AssetFilter assetFilter) will return a version of the history of an asset as specified in the AssetFilter.
Note: ledger does not permit blind writes, i.e., before performing a put on a particular asset, we must first get that asset. Furthermore scan is only allowed in read-only contracts, which means a single contract cannot both scan and put.
The rest of the contract proceeds in a straightforward manner. We first get the asset from the ledger, retrieve its current balance, add the deposit amount to it, and finally put the asset back into the ledger with its new balance.
At the end we must return a JsonObject. What the JsonObject contains is up to the designer of the contract. Here we have decided to include a status message, the old_balance, and the new_balance.
If you wish, you can view the other contracts that this application uses in the contract folder for this sample on GitHub.
Once you have written your contracts you will need to compile them, and this can be done as
$ ./gradlew build
Registering your certification and contracts
You should now have written and compiled your contracts. Before you can execute them, however, you will need to register them on the ScalarDL network. We will make use of the tools available in the ScalarDL Client SDK client/bin directory to register and execute the contracts. Please make sure you have access to this directory.
Now, you will need to have your certificate (e.g. client.pem) and its corresponding private key (e.g. client-key.pem), and ScalarDL up and running. Edit client.properties (found in the conf directory) to suit your configuration. It should contain lines that look something like:
scalar.dl.client.server.host=localhost
scalar.dl.client.server.port=50051
scalar.dl.client.cert_holder_id=alice
scalar.dl.client.cert_path=conf/client.pem
scalar.dl.client.private_key_path=conf/client-key.pem
If everything is set up properly you should be able to register your certificate on the ScalarDL network as
$ ${SCALAR_SDK_HOME}/client/bin/register-cert --properties ./conf/client.properties
You should receive status code 200 if successful.
To register your contracts you can create a contracts.toml file in the conf directory using the following format:
[[contracts]]
contract-id = "create-account"
contract-binary-name = "com.scalar.application.bankaccount.contract.CreateAccount"
contract-class-file = "build/classes/java/main/com/scalar/application/bankaccount/contract/CreateAccount.class"

[[contracts]]
contract-id = "deposit"
contract-binary-name = "com.scalar.application.bankaccount.contract.Deposit"
contract-class-file = "build/classes/java/main/com/scalar/application/bankaccount/contract/Deposit.class"

[[contracts]]
contract-id = "transfer"
contract-binary-name = "com.scalar.application.bankaccount.contract.Transfer"
contract-class-file = "build/classes/java/main/com/scalar/application/bankaccount/contract/Transfer.class"
In this example we will register three contracts: CreateAccount.java, Deposit.java, and Transfer.java. The contract-binary-name and contract-class-file are determined, but you are free to choose the contract-id as you wish. The contract-id is how you can refer to a specific contract using ClientService, as we will see below.
Once your toml file is written you can register all the specified contracts as
$ ${SCALAR_SDK_HOME}/client/bin/register-contracts --properties ./conf/client.properties --contracts-file ./conf/contracts.toml
Each successfully registered contract should return status code 200.
Executing contracts
You can now execute any registered contracts if you would like. For example, use our register contracts to create a couple of accounts, deposit funds into one of the accounts, and transfer some of these funds to the other account.
Create two accounts with ids a111 and b222. (Contract ids can be any string.)
$ ${SCALAR_SDK_HOME}/client/bin/execute-contract --properties ./conf/client.properties --contract-id create-account --contract-argument '{"id": "a111"}'
$ ${SCALAR_SDK_HOME}/client/bin/execute-contract --properties ./conf/client.properties --contract-id create-account --contract-argument '{"id": "b222"}'
Now, deposit 100 into account a111:
$ ${SCALAR_SDK_HOME}/client/bin/execute-contract --properties ./conf/client.properties --contract-id deposit --contract-argument '{"id": "a111", "amount": 100}'
Finally, transfer 25 from a111 to b222:
$ ${SCALAR_SDK_HOME}/client/bin/execute-contract --properties ./conf/client.properties --contract-id transfer --contract-argument '{"from": "a111", "to": "b222", "amount": 100}'
If you were running the application itself, you could execute these commands using the API endpoints.
ClientService
You should now have your contracts registered on the ScalarDL network. In order to execute these contracts from an application we will make use of ClientService class from the ScalarDL Client SDK.
The Client SDK is available on Maven Central, and it can be installed in your application using Gradle by adding the following dependency to your build.gradle:
dependencies {
    compile group: 'com.scalar-labs', name: 'scalardl-java-client-sdk', version: '2.0.4'
}
The following snippet shows how you can instantiate a ClientService object, where properties should be the path to your client.properties file.
Injector injector =
        Guice.createInjector(new ClientModule(new ClientConfig(new File(properties))));
try (ClientService clientService = injector.getInstance(ClientService.class)) {
  ...
}
ClientService contains a method executeContract(String id, JsonObject argument) which can be used to, of course, execute a contract. For example:
JsonObject argument = Json.createObjectBuilder().add("id", "010-123456789").build();
ContractExecutionResult result = clientService.executeContract("create-account", argument);
will execute the CreateAccount contract with argument {"id": "010-123456789"}, as we did above. Note that we call the contract using the supplied id create-account that we chose when registering the contract.
The result of executing the contract is a ContractExecutionResult. It contains, result and proofs, each of which can be obtained respectively as
result.getProofs()
result.getResult();
What is next?
We hope that this has provided you with enough information to get started writing your own apps. Here are some ideas of what you can try next.
- Visit the ScalarDL Client SDK github page.
- The ScalarDL Emulator lets you test your contracts on an in-memory ledger.