Getting Started with ScalarDL
This document explains how to get started with ScalarDL by running your first simple contract using the Client SDK. Here, we assume that you have already installed ScalarDL, and ScalarDL Ledger is running and listening to 50051 and 50052 ports on localhost. If you don't have such an environment, please follow the document. We also assume that you already have a certificate and a private key required to run contracts.
What is ScalarDL?
ScalarDL is scalable and practical Byzantine fault detection middleware for transactional database systems, which achieves correctness, scalability, and database agnosticism.
ScalarDL is composed of Ledger, Auditor, and Client SDK as shown in the following figure. ScalarDL Ledger manages application data in its own unique way using hash-chain and digital signature. ScalarDL Auditor is an optional component and manages a copy of Ledger data without depending on Ledger to identify the discrepancy between Ledger and Auditor data. The Client SDK is a set of user-facing programs to interact with Ledger and Auditor. For more details, please read the design doc and implementation details.
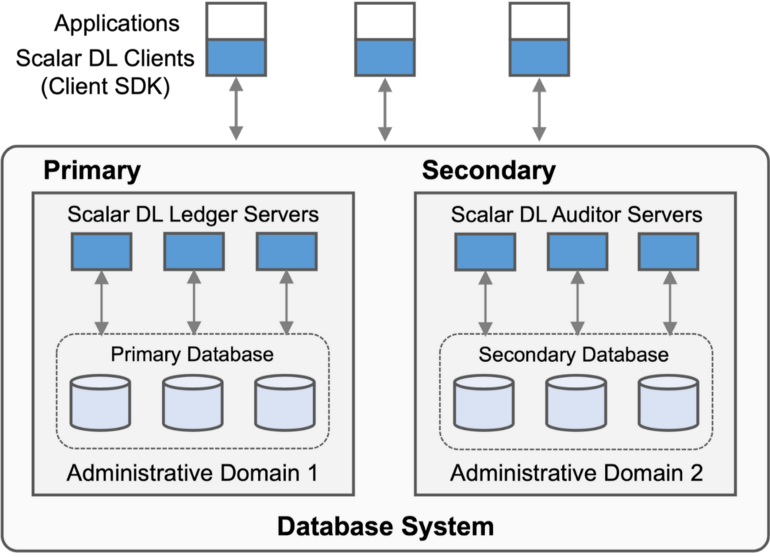
ScalarDL (Ledger and Auditor) abstracts data as a set of assets, where each asset is composed of the history of a record identified by a key called asset_id and a historical version number called age.
In this document, you will create a very simple application to manage an asset's status using ScalarDL Client SDK.
Download the Client SDK
The Client SDK library is available on Maven Central. You can install it in your application using your build tool such as Gradle. For example in Gradle, you can add the following dependency to your build.gradle.
dependencies {
    compile group: 'com.scalar-labs', name: 'scalardl-java-client-sdk', version: '<version>'
}
From here, let's use the scalardl-java-client-sdk repo that has a sample build.gradle, sample contracts, and tools for quick testing.
First, specify a version (e.g., 3.6.0) to use. Please see tags for available versions.
VERSION=X.Y.Z
Then, clone the repo and download the tools.
git clone https://github.com/scalar-labs/scalardl-java-client-sdk.git
cd scalardl-java-client-sdk
git checkout v$VERSION
curl -OL https://github.com/scalar-labs/scalardl-java-client-sdk/releases/download/v$VERSION/scalardl-java-client-sdk-$VERSION.zip
unzip scalardl-java-client-sdk-$VERSION.zip
mv scalardl-java-client-sdk-$VERSION client
Configure properties
The first thing you need to do is to configure the Client SDK. The following sample properties are the minimum required properties for the Client SDK to interact with ScalarDL Ledger.
[client.properties]
# A host name of ScalarDL Ledger
scalar.dl.client.server.host=localhost

# An ID of a certificate holder. It must be configured for each private key and unique in the system.
scalar.dl.client.cert_holder_id=foo

# A certificate file path to use.
scalar.dl.client.cert_path=/path/to/foo.pem

# A private key file path to use.
scalar.dl.client.private_key_path=/path/to/foo-key.pem
A sample client.properties file is available at the conf directory, so let's copy it to the current directory.
cp conf/client.properties .
Please update the values of the copied client.properties file depending on your environment.
Register the certificate
Next, let's register your certificate to ScalarDL Ledger. Please check caclient-getting-started for how to prepare a certificate.
This time, let's use a simple tool to register your certificate as follows.
client/bin/register-cert --properties client.properties
The registered certificate will allow you to register and execute contracts and will also be used for detecting Byzantine faults in databases.
Note that you can only add new certs and cannot update existing certs in place for security reasons. When you want to add a new cert, increment scalar.dl.client.cert_version before executing the registration tool.
Create a contract
Contracts in ScalarDL are simply Java classes that extend the predefined base contract classes (such as JacksonBasedContract class) and override the invoke method. Let's take a closer look at the StateUpdater.java contract which creates an asset and associates some states with it.
package com.org1.contract;

import com.fasterxml.jackson.databind.JsonNode;
import com.scalar.dl.ledger.contract.JacksonBasedContract;
import com.scalar.dl.ledger.exception.ContractContextException;
import com.scalar.dl.ledger.statemachine.Asset;
import com.scalar.dl.ledger.statemachine.Ledger;
import java.util.Optional;
import javax.annotation.Nullable;

public class StateUpdater extends JacksonBasedContract {

  @Nullable
  @Override
  public JsonNode invoke(Ledger<JsonNode> ledger, JsonNode argument, @Nullable JsonNode properties) {
    if (!argument.has("asset_id") || !argument.has("state")) {
      // ContractContextException is the only throwable exception in a contract and
      // it should be thrown when a contract faces some non-recoverable error
      throw new ContractContextException("please set asset_id and state in the argument");
    }

    String assetId = argument.get("asset_id").asText();
    int state = argument.get("state").asInt();

    Optional<Asset<JsonNode>> asset = ledger.get(assetId);

    if (!asset.isPresent() || asset.get().data().get("state").asInt() != state) {
      ledger.put(assetId, getObjectMapper().createObjectNode().put("state", state));
    }

    return null;
  }
}
This contract will extract a client-defined asset ID (asset_id) and state (state) from the argument and associate the asset ID with the state in the ledger if the given state is different from the asset's current state.
Next we compile the contract as follows.
./gradlew assemble
This will generate build/classes/java/main/com/org1/contract/StateUpdater.class.
Register the contract
Let's register your contract. Here again we use a simple tool.
client/bin/register-contract --properties client.properties --contract-id StateUpdater --contract-binary-name com.org1.contract.StateUpdater --contract-class-file build/classes/java/main/com/org1/contract/StateUpdater.class
Please set a globally unique ID for the contract ID (e.g. StateUpdater in the above command).
You can set different contract IDs on the same contract to clarify "who did what" in a tamper-evident way.
For example, let's think about a voting application. In the application, anyone can vote with the same voting logic, and hence can use the same Contract, but A's vote and B's vote need to be properly and securely distinguished; A cannot vote for B, and vice versa. Having different contract IDs on the same contract can be utilized to achieve such things.
Execute the contract
Now you are ready to execute the contract with the following command.
client/bin/execute-contract --properties client.properties --contract-id StateUpdater --contract-argument '{"asset_id":"some_asset", "state":3}'
In the contract argument, the value specified with the key asset_id must be unique globally for each asset.
Validate the states of Ledger
You can validate the states of Ledger by executing the following command.
client/bin/validate-ledger --properties client.properties --asset-id="some_asset"
What the validation does is depending on how you set up and configure ScalarDL. Briefly speaking, if only ScalarDL Ledger is used, the validation traverses assets to see if the assets can be recomputed and have a valid hash-chain structure. With ScalarDL Ledger and Auditor, the validation checks discrepancies (i.e., Byzantine faults) between the states of Ledger and Auditor without centralized coordination. Please read Getting Started with ScalarDL Auditor for more details about the validation with Auditor.
Create your own contracts
As we explained above, what you need to do to create your contracts is to extend the predefined base contract classes and override the invoke method as you like. For more detail, please look at A Guide on How to Write a Good Contract.
Interact with ClientService
The tools we have used above are useful for simple testing purposes, but should not be used for production applications. The Client SDK also provides a service layer called ClientService which should be used for production applications.
The following is a code snippet showing how to use ClientService to execute a contract.
  // ClientServiceFactory should always be reused.
  ClientServiceFactory factory = new ClientServiceFactory();

  // ClientServiceFactory creates a new ClientService object in every create method call
  // but reuses the internal objects and connections as much as possible for better performance and resource usage.
  ClientService service = factory.create(new ClientConfig(new File(properties));
  try {
    // create an application-specific argument that matches your contract
    JsonNode jsonArgument = ...;
    ContractExecutionResult result = service.executeContract(contractId, jsonArgument);
    result.getContractResult().ifPresent(System.out::println);
  } catch (ClientException e) {
    System.err.println(e.getStatusCode());
    System.err.println(e.getMessage());
  }

  factory.close();
First, you should always use ClientServiceFactory to create ClientService objects.
ClientServiceFactory caches objects required to create ClientService and reuses them as much as possible on the basis of given configurations, so ClientServiceFactory object should always be reused.
ClientService is a thread-safe client that interacts with ScalarDL components (e.g., Ledger and Auditor) to register certificates, register contracts, execute contracts, and validate data.
When you execute a contract, you need to specify the corresponding argument type of the contract. For example, if your contract extends JacksonBasedContract, you need to pass JsonNode argument when you execute the contract.
For more information, please take a look at Javadoc.
Run and test your contracts
To quickly run and test your contracts in your local environment, ScalarDL Samples is useful. To run ScalarDL in a production environment, please see scalar-kubernetes for details.